 Free Shipping


Helpful Hints
Thank you
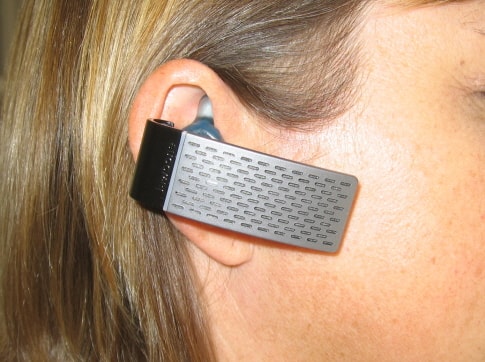
Thank you for purchasing a custom earpiece from Avery Sound Company. We would like to provide you with some general information about your earpiece and give you some hints that will make your first experience using the earpiece a little bit easier. While the picture shows a Jawbone Bluetooth, the following discussion applies to all our custom earpieces.
Start Slowly
First of all, it cannot be overemphasized that you need to start slowly with a custom earpiece. When you purchase a new pair of shoes, the fit might be perfect but you wouldn�t wear them to the fair for eight hours on the first day without expecting some very sore feet by the end of the day. The same holds true for a custom earpiece. You need to give your ear time to adjust to this new experience. Start with an hour or two on the first day and slowly build up time as your ear adjusts. If you have any soreness stop wearing the earpiece for a day or two until the soreness disappears completely and then start over slowly again. Your ear will adjust to its new companion but it can take a little bit of time. We have forty-five days from the initial date of production for the lab warranty on fit so there should be plenty of time to work with the earpiece and still make adjustments if needed. As a custom made product we do not offer refunds once production of the earpiece has been started but we will work with you during this warranty time period to obtain a comfortable fit if you have any problems. Remakes if needed will always be in the same color as the original order.
Inserting and Removing the Earpiece
If this is the first time you have used a custom earpiece you might find putting the earpiece in your ear and taking it back out can be a bit of a challenge. Rest assured, this process becomes much easier after a few practice rounds and before you know it you won�t even be thinking about what you are doing. It will become as automatic as putting on a pair of glasses. Remember, there are tens of thousands of people in front of you using custom earpieces every day. Day one was a bit challenging for many of them as well.
Each ear is unique but in general, most people will find inserting the bottom of the earpiece first and then trying to tuck in the top does NOT work very well. The same problems are experienced when trying to insert the top first and then trying to tuck in the bottom. The contours of your ear are such that inserting the earpiece using either of these two methods is often unsuccessful and causes soreness. You probably will be unable to seat the earpiece completely in the ear and it will fall back out within a few minutes.
The key for most people is to insert the leading edge first and rotate the earpiece towards the back of the head to drop the trailing edge in place. The best way to teach this technique is to start with some pictures and describe some earpiece terminology.
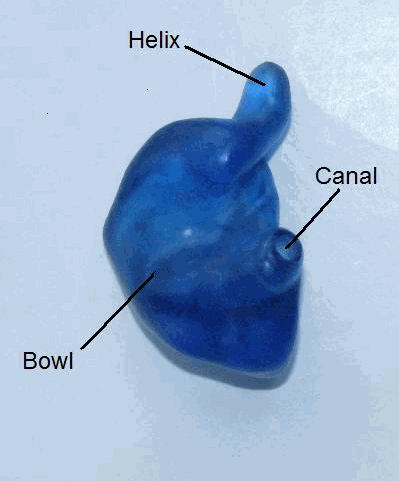
Earpiece Terminology
Shown is a custom earpiece with three labeled parts.
The pointed piece at the top of each earpiece is called the helix. When the earpiece is properly placed in your ear the helix portion will point straight up towards the ceiling. The bottom portion of the earpiece is called the bowl. Built up from this area is a slightly taller portion of the earpiece with a hole drilled through to the other side. This is called the canal. It is through this tube that the sound will pass from the speaker to your ear.
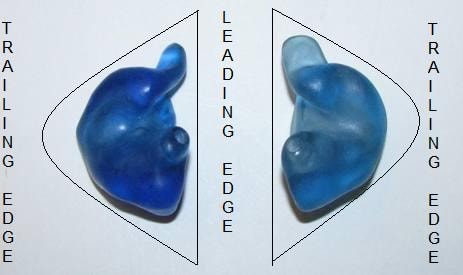
Pictured are two earpieces side by side. The earpiece on the left is for a left ear. The earpiece on the right is for a right ear. Both earpieces are shown with their outer face down on the flat surface. The outer face is the side with the hole that will attach to your Bluetooth, earphone, or other device.
Earpiece Terminology
As shown, the outline of a custom earpiece for a left ear looks a little bit like a backwards upper case D. The outline of a custom earpiece for the right ear looks a little bit like the outline of a forward facing upper case D. Regardless of which side the earpiece is for, the straight line of the D (or backwards D) is called the leading edge of the earpiece. This is the edge that faces forward when the earpiece is properly positioned in your ear. The trailing edge is the curved edge which will be facing backwards when the earpiece is properly positioned in the ear.
Look again at the picture. The leading edges of the left and right earpieces are facing each other at the center of the picture. The trailing edges for each earpiece are on the outer edges of the picture. The leading edge is fairly straight. The trailing edge is more or less one continuous curve from top to bottom.
Begin Practicing
Now that you are familiar with some earpiece terminology you are ready to work with the earpiece. When putting the earpiece in your ear for the first time we highly suggest you disconnect it from the Bluetooth or other audio device. This will allow you to manipulate the earpiece a little more easily until you get a feel for the process.
For purposes of this illustration, we will show the steps to use for an earpiece for the right ear. If your earpiece is for the left ear all the steps will be done as a mirror image of this description.
Pick up the earpiece with your right hand. Hold the earpiece in your hand as shown below.
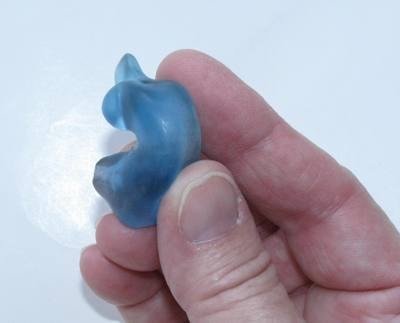
Note that the side of the earpiece that will attach to the audio device is not visible. It is facing towards the fingers.
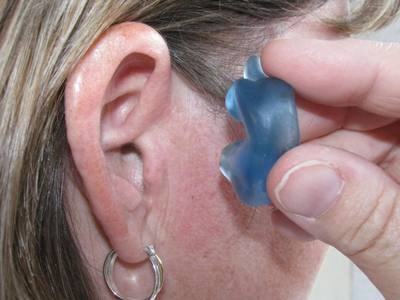
Raise the earpiece towards the ear as shown. Note that the earpiece is being held at an angle. The leading edge of the earpiece is closer to the ear than the rest of the earpiece.
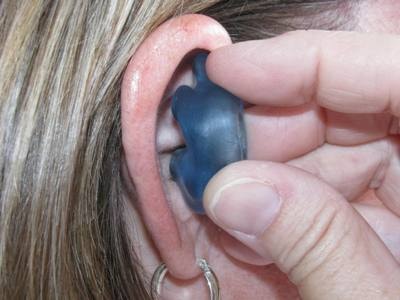
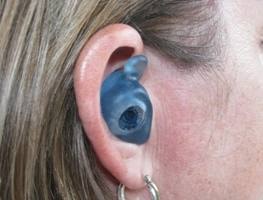
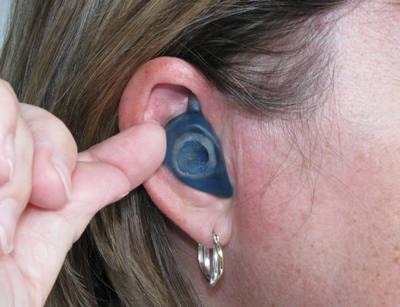
Continue to raise the earpiece towards your ear with the leading edge of the earpiece finally touching both the top of the helix area and the bottom of the bowl. Note the earpiece is not flat against the ear but rather positioned at an angle which allows just the leading edge of the earpiece to make contact with your ear. Gently tuck the leading edge into the top and bottom of the ear. The earpiece will not be secure at this point. The goal is to just tuck that leading edge into place to begin the process.
The picture shows the position of the earpiece at this point in the process. The model has moved her hand and is holding the earpiece in with the tip of the finger so you can see exactly how the earpiece is positioned. You will not do this step. It is just to provide a clear view of the position of the earpiece.
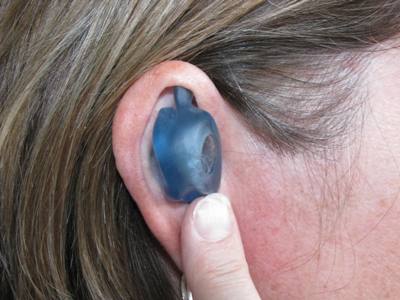
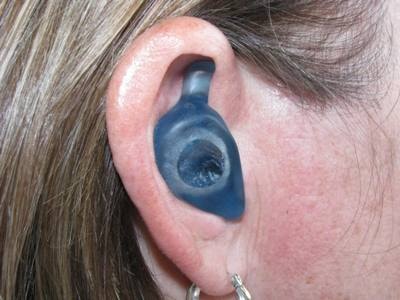
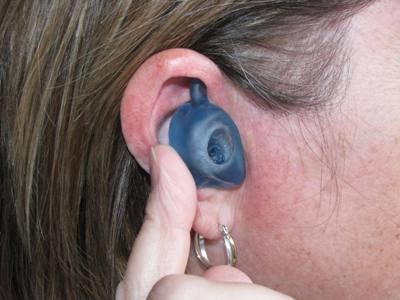
Now gently rotate your wrist to the right (or toward the back of your head) to drop the trailing edge of the earpiece in place. Be sure to keep that leading edge tucked in as you apply this rotation. This will drop the bowl of the earpiece in place.
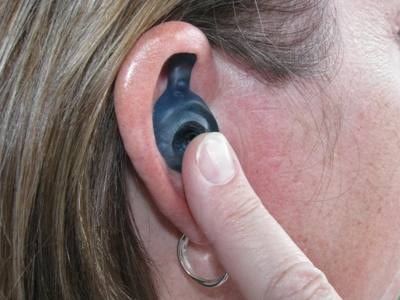
A slight push with your finger at this point will ensure the earpiece is completely seated.
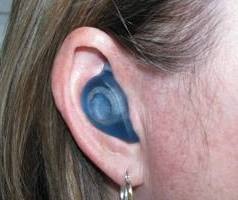
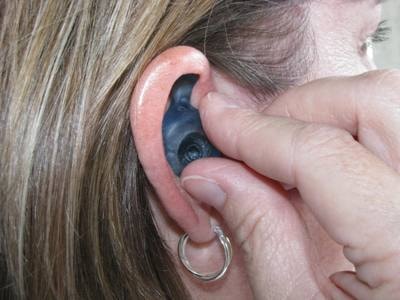
Shown are two pictures angled from front and back that show a properly seated earpiece. Note that the bowl is fully seated and the helix is tucked into the cartilage of the upper ear.
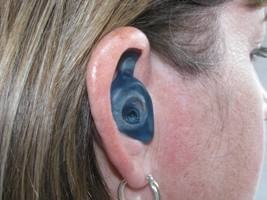
The following two pictures angled from front and back show an improperly seated earpiece. Note that the bowl is not fully seated and the helix portion of the earpiece is not tucked in to the fold of cartilage at the top of the ear. This earpiece will be uncomfortable and will fall out of the ear after a short period of time.
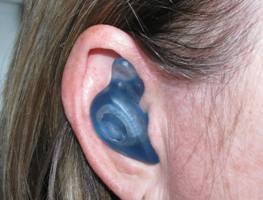
To end on a positive note, here is one more straight on picture of a properly positioned earpiece.
The custom earpiece is now securely seated. The earpiece should not fall out even if you shake your head. The earpiece might feel a bit too big. That is normal. You will get used to this feeling very quickly.
Removing the earpiece is best accomplished by reversing this process. Insert the tip of your finger nail behind the earpiece to pull out the trailing edge. When a bluetooth is attached to the earpiece do not pull on the bluetooth to remove the unit and earpiece from your ear. Pulling on the bluetooth will stress the connection between the bluetooth and the custom earpiece since the custom earpiece fit will be very snug in your ear. Pulling on the device will eventually wear the fitting and degrade the attachment security.
Once the trailing edge is loose continue rotating the earpiece forward to remove leading edge and earpiece from the ear.
Summary
We recommend practicing these steps several times until you can easily insert the earpiece and remove it from your ear. Once you feel comfortable with the process attach the audio device to the earpiece and practice a few times with the complete set up. The audio device will probably interfere a little bit with the steps you have been practicing. One area in particular involves a Bluetooth that extends horizontally towards the front of your face. You might find that the Bluetooth does not allow you to angle the earpiece enough to cleanly tuck in the leading edge of the earpiece first. Again, this will get easier with time and practice but until then you might find that rotating the Bluetooth down towards the floor or up towards the ceiling will allow you to angle the earpiece properly to tuck in that leading edge. Once the earpiece is fully in place you can then rotate the Bluetooth back to the correct position.
Care and Cleaning
Your custom earpiece is made of a very durable vinyl. This earpiece will last a long time with proper care. Avoid leaving the earpiece in direct sunlight or exposed to long periods of extreme heat. The oil from your skin will build up on the earpiece and can make the earpiece less secure in your ear. An occasional cleaning will remove these oil deposits. Detach the earpiece from the bluetooth or speaker and wash with warm soapy water. Do not use any chemicals or solvents such as rubbing alcohol. Let dry completely before reattaching to the electronic device. While our earpieces have a one year material warranty, with proper care the earpiece will last for many years.